


Welcome to our dynamic AppSheet tutorial series, where we’ve been on a transformative journey of exploring the power of no-code app development. From mastering project tracking and app customization to unraveling the magic of data entry and visualizations, we’ve covered an array of topics to empower you with the knowledge and tools to create exceptional apps.
As we’ve progressed through this series, we’ve witnessed the versatility of AppSheet’s features and their ability to streamline operations, improve efficiency, and facilitate real-time collaboration. In this comprehensive tutorial, we will walk you through the fundamentals of the SELECT function, its syntax, and practical examples to help you harness its power for efficient data retrieval in your app-building journey.
Understanding the SELECT Function
At its core, the SELECT function in AppSheet allows you to retrieve specific data from your Google Sheets or tables. It acts as a filter, helping you organize information based on certain conditions. Whether you want to display a dropdown menu with dynamic options, filter data based on specific criteria, or display unique values, the SELECT function can be your go-to tool.
How Does SELECT Function Help?
The SELECT function in AppSheet serves as a powerful tool that allows you to retrieve and filter data from your app’s underlying database. By understanding the various scenarios where the SELECT function comes into play, you can harness its potential to enhance your app’s functionality and provide a seamless user experience. Let’s explore some key areas where the SELECT function proves invaluable:
Dynamic Data Views
As an app creator, you often encounter the need to present data in different ways based on user requirements. The SELECT function enables you to create dynamic data views by applying filters to your app’s data. Whether it’s displaying specific project statuses, grouping data by categories, or showcasing relevant information based on user input, the SELECT function empowers you to customize data views dynamically.
Data Management and Efficiency
Managing large datasets can be challenging without an effective way to filter and organize information. This function comes to the rescue, enabling you to retrieve specific data based on conditions. Whether it’s retrieving all projects assigned to a particular team member or filtering tasks by priority, the SELECT function streamlines data management, making your app efficient and user-friendly.
Data Integrity and Accuracy
Data integrity is paramount in any business application. The SELECT function allows you to set conditions to ensure that only valid and accurate data is displayed to users. By filtering out irrelevant or incomplete data, you can maintain data integrity and prevent errors that could impact decision-making.
Seamless User Experiences
User experience is key to the success of any app. The SELECT function plays a vital role in providing seamless user experiences by presenting data that aligns with user preferences and requirements. Whether it’s offering personalized views or displaying relevant information based on user interactions, this function enhances user engagement and satisfaction.
Real-Time Data Updates
Apps often require real-time data updates to keep users informed and aligned with ongoing changes. The SELECT function allows you to create dynamic data views that automatically update as the underlying data changes. This real-time functionality ensures that users always have access to the most up-to-date information, enabling better decision-making and collaboration.
The SELECT Function in Action
To get started, let’s take a look at some practical examples of how the SELECT function works with different data sets:
Example 1: Selecting Students
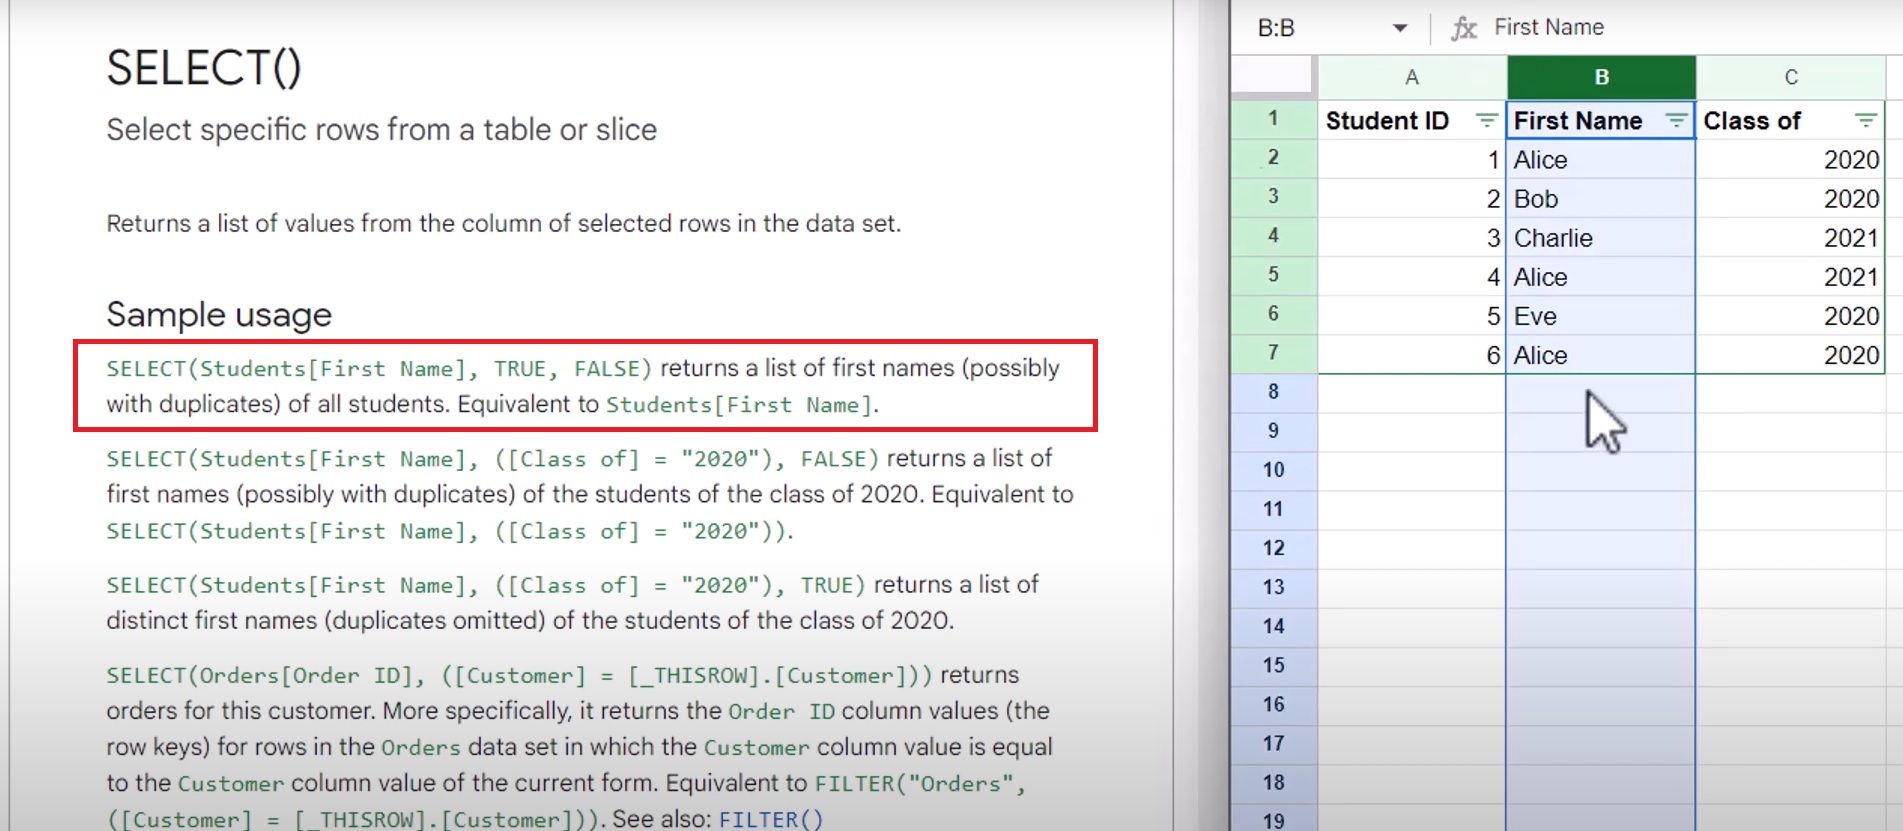
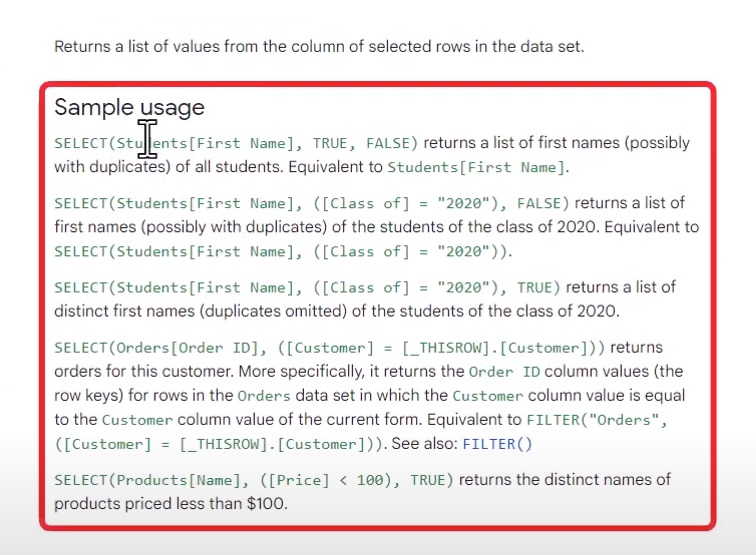
Suppose you have a data set named “students” with columns like “First Name,” “Last Name,” “Age,” and “Class.” If you want to retrieve a list of all the students’ first names, you can use the SELECT function as follows:
SELECT(students[First Name])
This command instructs AppSheet to fetch all the data from the “First Name” column in the “students” table. The result will be a list of all the students’ first names.
Example 2: Using True and False
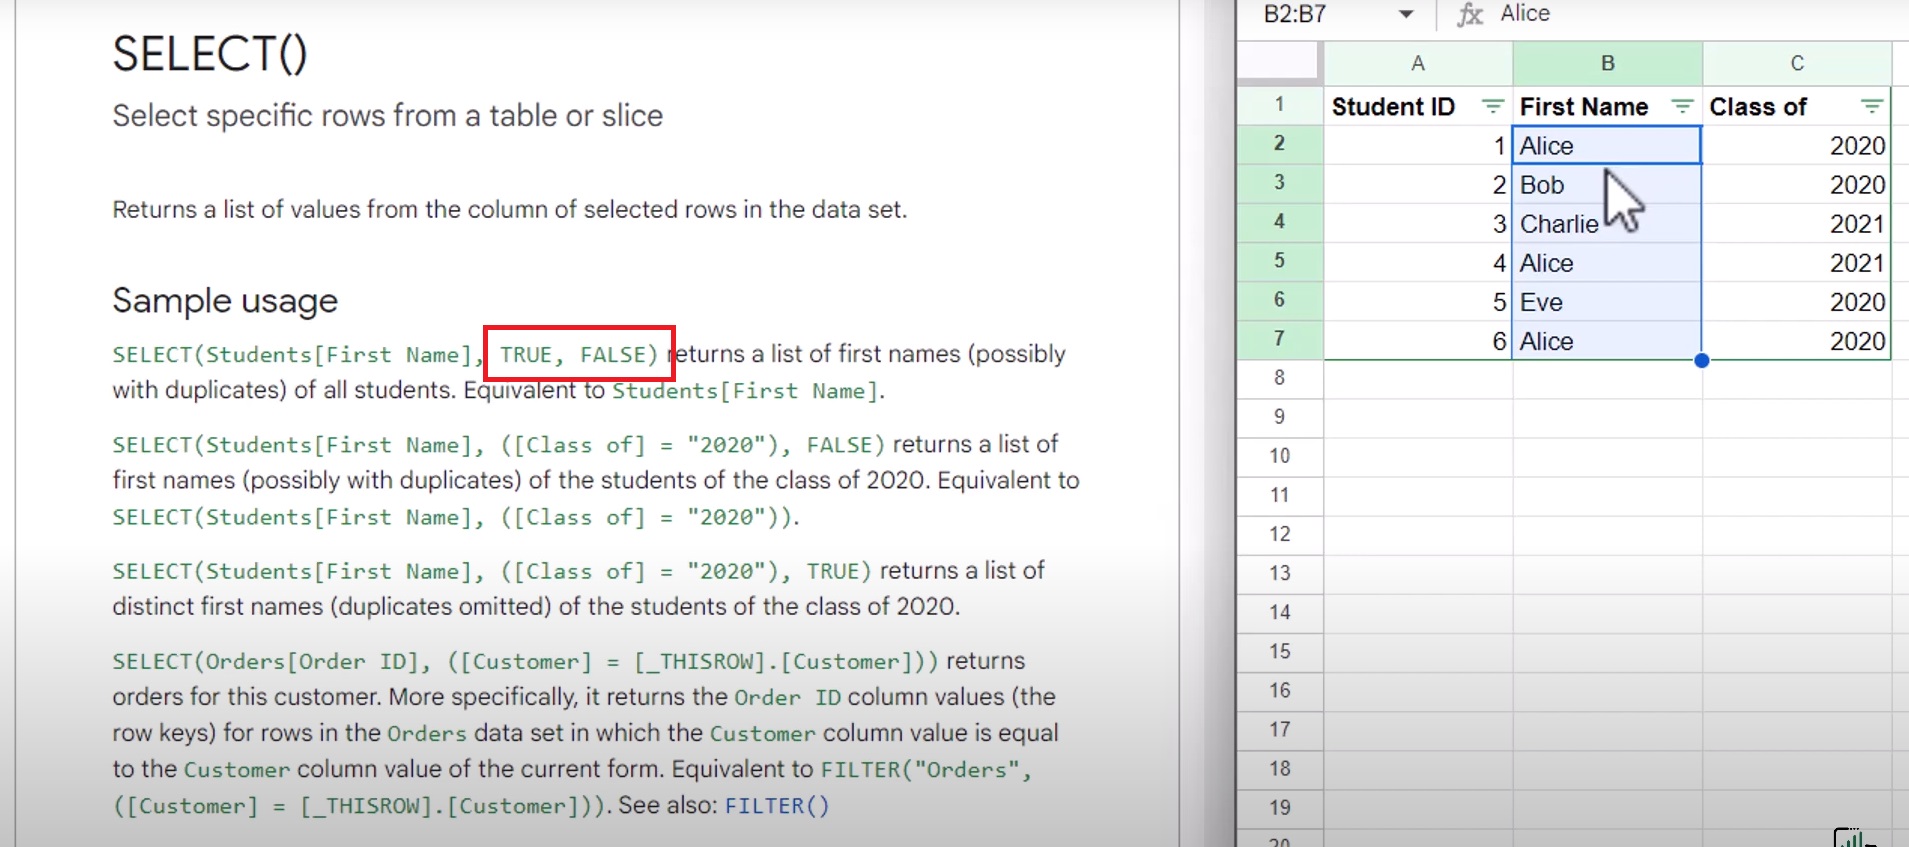
By default, when you use the SELECT function without any filters, it assumes TRUE, which means it will return all the data from the specified column. However, you can use FALSE or GROUPBY() to retrieve unique values.
SELECT(students[Class], FALSE)
In this example, we are selecting the “Class” column and using FALSE to specify that we want all the values, including duplicates. If we were to use GROUPBY(), it would return only unique class values.
Example 3: Filtering by Condition
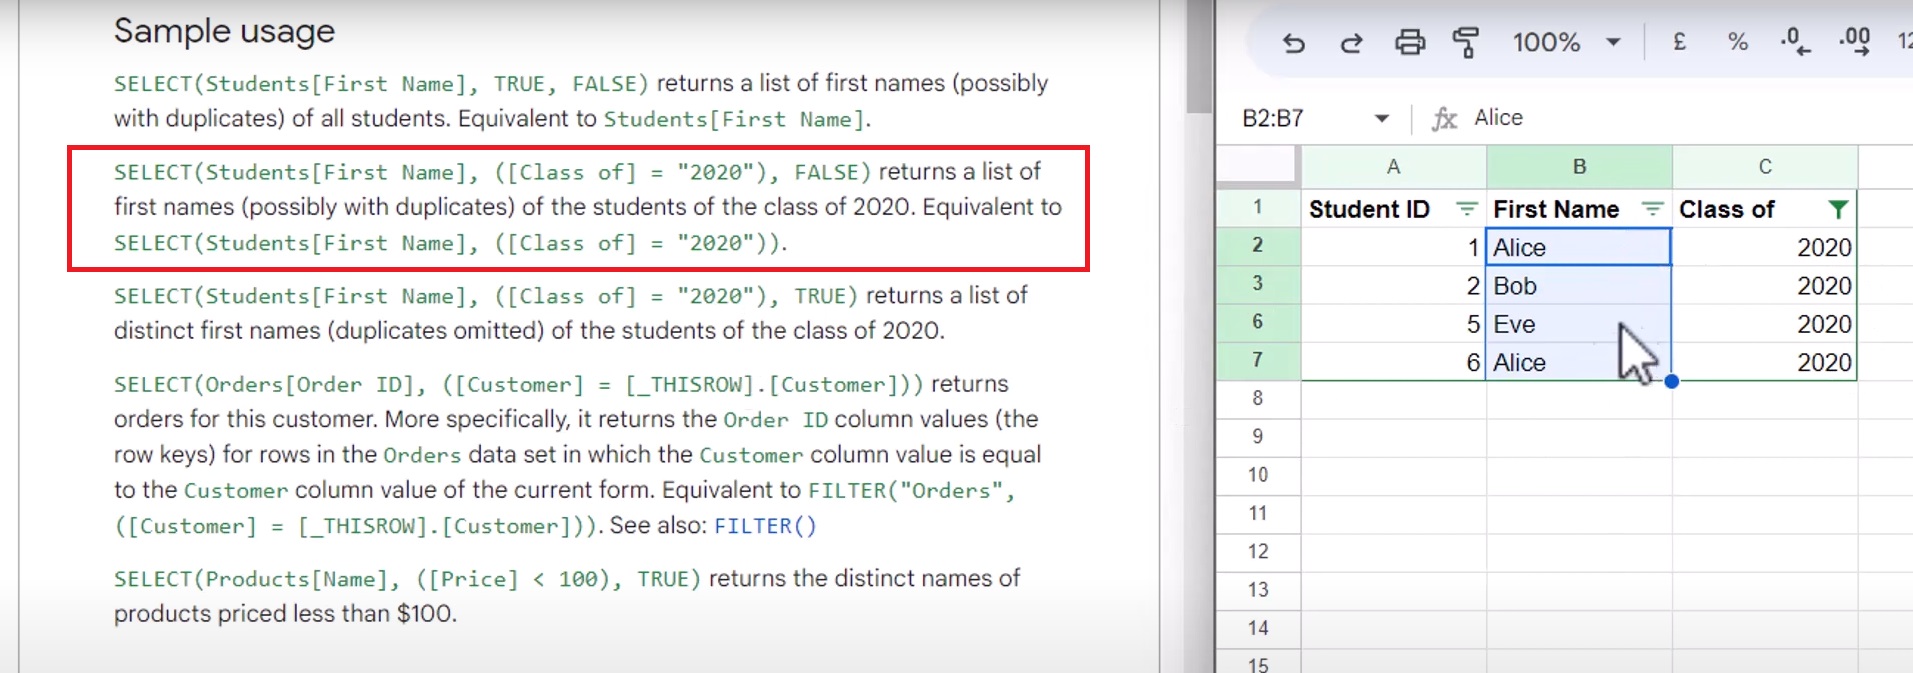
Often, you’ll need to filter data based on certain conditions. For instance, let’s say you want to select all the students from the “Class of 2020.” Here’s how you can do it:
SELECT(students[First Name], [Class] = “2020”)
In this command, we specify that we want the “First Name” column from the “students” table where the “Class” column equals “2020.” The result will be a list of first names of students belonging to the “Class of 2020.”
Example 4: Dynamically Matching Data

AppSheet allows you to create dynamic filters using THISROW.[Column Name]. This feature comes in handy when you want to match data dynamically based on the user’s input.
SELECT(orders[Order ID], [Customer] = [ThisRow].[Customer])
Let’s say you have an “Orders” table with columns like “Order ID,” “Customer,” and “Product.” In this example, we are selecting the “Order ID” from the “orders” table where the “Customer” column matches the value of the current row’s “Customer” column. This dynamic filter ensures that the SELECT function retrieves the correct order ID based on the customer’s name in each row of your app.
Example 5: Filtering Based on Numeric Condition

You can also filter data based on numeric conditions. For instance, if you want to select all product names with a price less than $100 from a “Products” table, you can use the following command:
SELECT(products[Product Name], [Price] < 100)
In this command, we are selecting the “Product Name” column from the “products” table where the “Price” column is less than $100. The result will be a list of product names with prices below $100.
Master The SELECT Function
You’ve now learned how to use the SELECT function in AppSheet and explored various ways to customize and enhance its functionality. By combining SELECT with other functions and utilizing dynamic filters, you can create powerful, user-friendly apps that cater to your specific business needs.
As you continue your AppSheet journey, don’t hesitate to experiment with different combinations of functions and explore the vast possibilities of data manipulation. Remember, AppSheet’s documentation and support resources are valuable assets to deepen your understanding and troubleshoot any challenges you may encounter.
In the upcoming articles, we’ll delve into some other advanced formulas that will help you navigate this app in a better way. Stay tuned for more exciting content that will elevate your app-building expertise to new heights. Head over to AI Data House, where you’ll find straightforward instructions to kickstart your experience.